Фотоблог 365
24 декабря 2016 г.
Обзор и сравнение макро-объективов Olympus M.Zuiko 30mm f/3.5 и 60mm f/2.8
На выставке Photokina 2016, спустя почти четыре года после выпуска 60mm f/2.8 Macro был представлен новый объектив для макросъемки 30mm f/3.5 Macro. Хотя оба этих объектива разработаны для макросъемки, они используются для реализации разных задач.
Конструкция и удобство использования
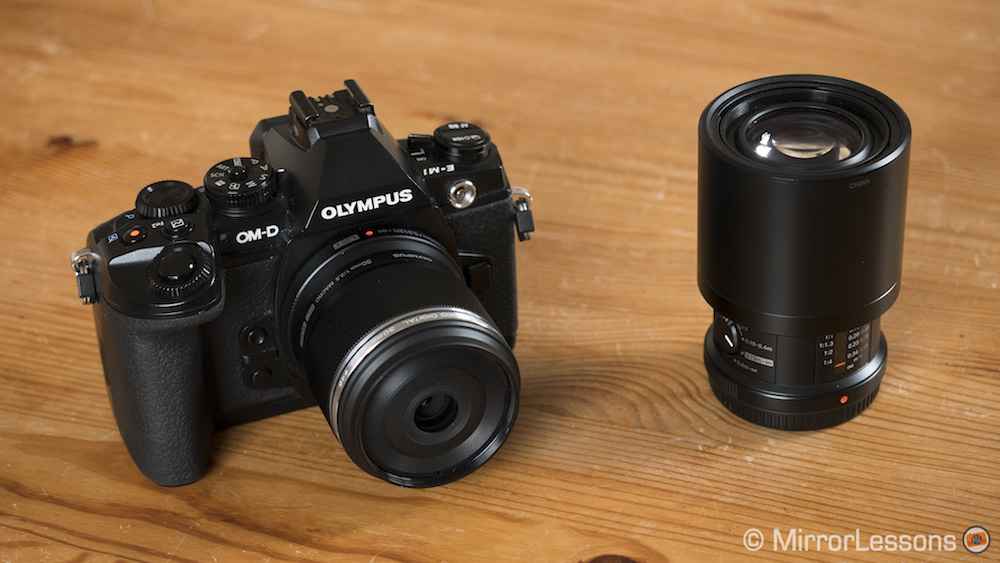
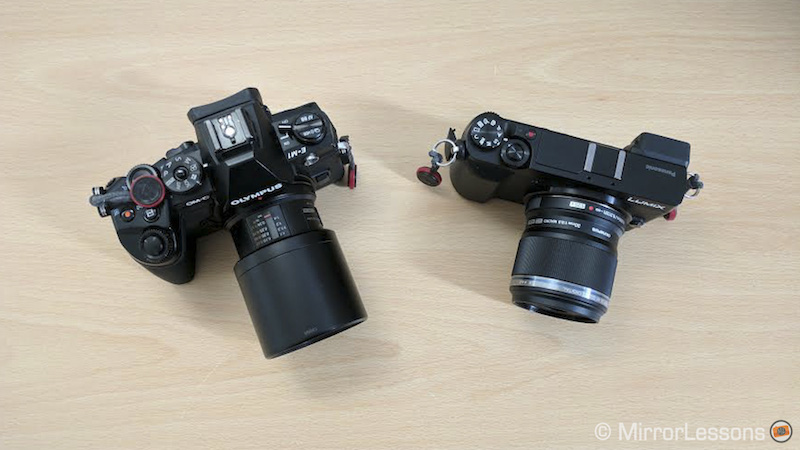
Оба объектива являются макро-объективами с фиксированным фокусным расстоянием и предназначены для использования с камерами стандарта Micro 4/3. Хотя оба объектива очень легкие и компактные чтобы соответствовать камерам Micro 4/3, объектив 60mm f/2.8 длиннее и тяжелее, чем 30mm f/3.5. При этом диаметр практически не отличается, что делает возможным использовать одинаковые фильтры на 46 мм.
Корпуса объективов изготовлены из высококачественного пластика и имеют металлическое крепление. Однако только 60mm обладает защитой от брызг и пыли, поэтому чтобы не повредить свой 30-миллиметровый макро-объектив под дождем, лучше позаботиться о его использовании в более щадящих условиях.
Оба объектива имеют конструкцию привода кольца автофокуса, которое привязано к блоку линз не напрямую, а управляет с помощью электроники и мотора фокусировки. Кольцо фокусировки у обоих объективов работает точно и является удобным. Чтобы перейти от бесконечности до минимальной дистанции фокусировки и наоборот, придется сделать довольно много оборотов, именно поэтому переключатель у 60mm f/2.8 для ограничения диапазона фокусировки является весьма полезным. У объектива есть возможность установить диапазон за пределами которого объектив не будет пытаться фокусироваться, при этом можно очень быстро переключаться с близкой дистанции на дальнюю. А вот у 30mm f/3.5 такой возможности нет, и придется крутить кольцо фокусировки, пока необходимая точка не будет достигнута.

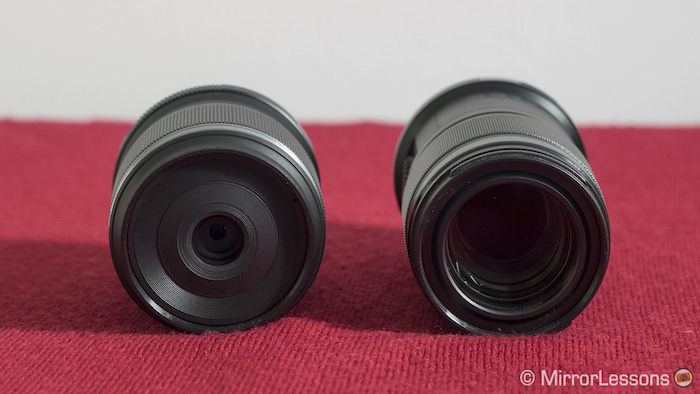
Еще одним преимуществом объектива 60mm является его бленда LH-49 (продается отдельно), которую можно сдвинуть вниз когда она не нужна. Этот механизм позволяет просто оставить бленду надетой на объектив, хотя она и блокирует кольцо фокусировки в «походном» положении. К сожалению до сих пор нет бленды для объектива 30mm f/3.5, поэтому придется действовать более осторожно, чтобы не повредить передний элемент объектива и тщательней следить за попаданием паразитного света.

Если говорить о переднем элементе объектива, то сразу понятно, что у объектива 30mm он намного меньше, и благодаря этому менее уязвим, чем передняя линза у 60mm.
Качество оптики
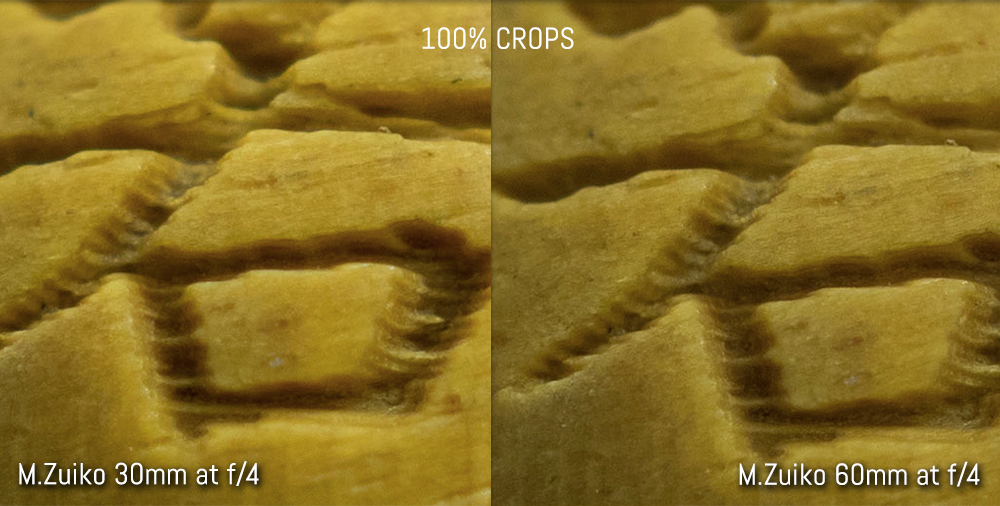
У объектива 60mm диапазон значений диафрагмы меняется от f/2.8 до f/22, что обеспечивает немного большую гибкость, чем f/3.5 — f/22 у объектива 30mm.
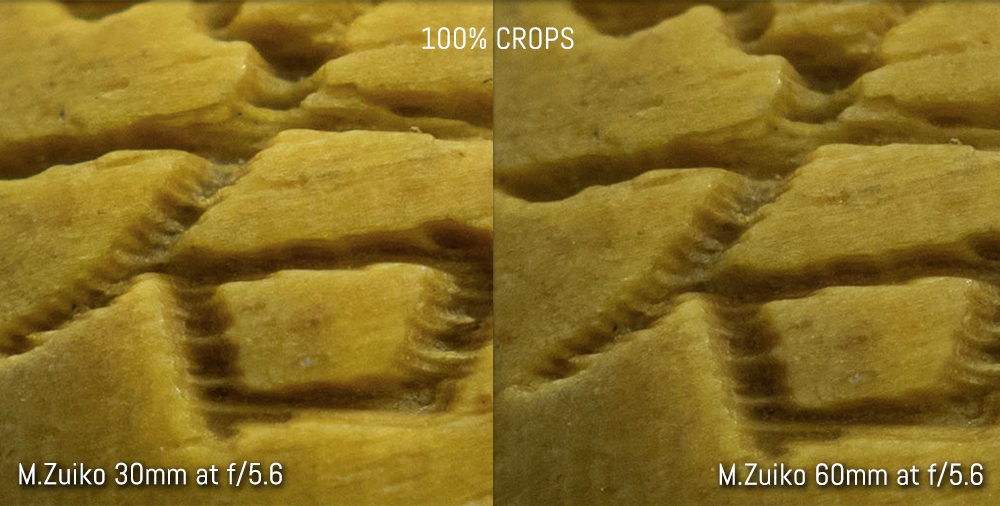
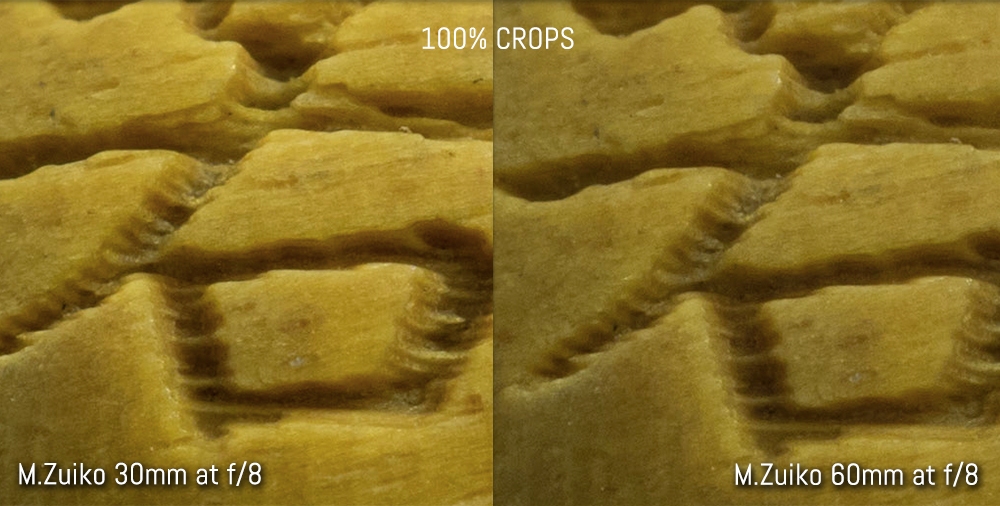
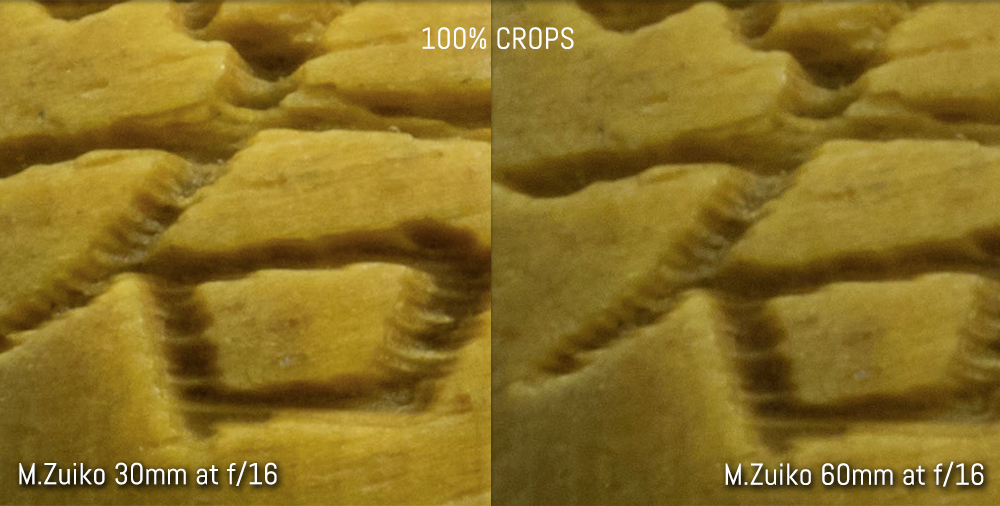
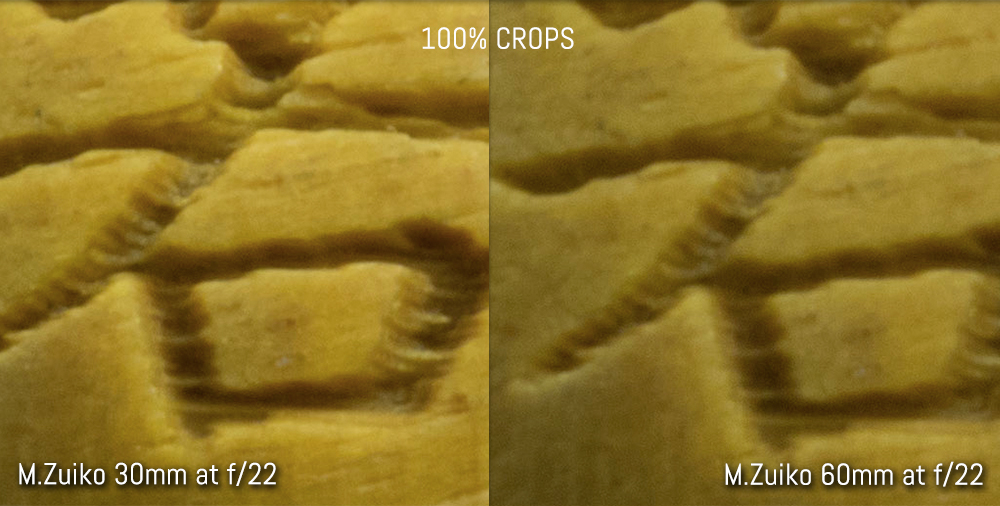
Наилучшая резкость у 60mm получается при значении диафрагмы f/4, но все варианты от f/2.8 до f/8 получаются почти одинаковыми. Что касается объектива 30mm, то он достигает максимума при f/5.6, но f/3.6 и f/8 также хороши. Оба объектива начинают проявлять признаки дифракции при f/11, а f/16 и f/22 дают уже довольно мягкое изображение.
Так как оба объектива предназначены для макро-фотографии, то резкость будет сравниваться на близком расстоянии.
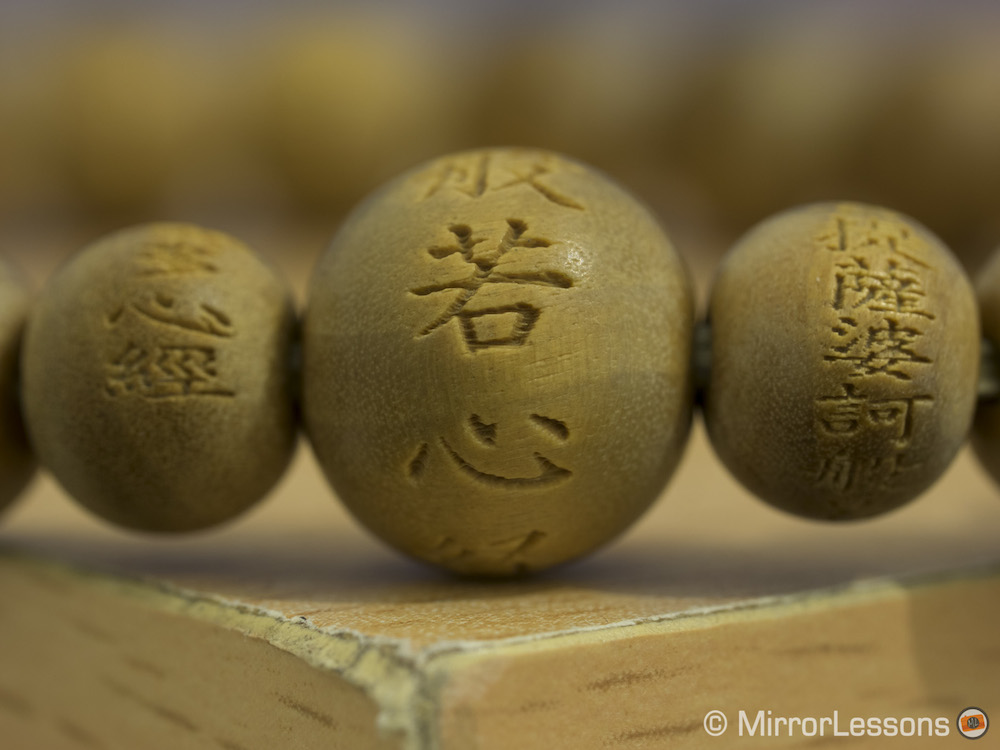
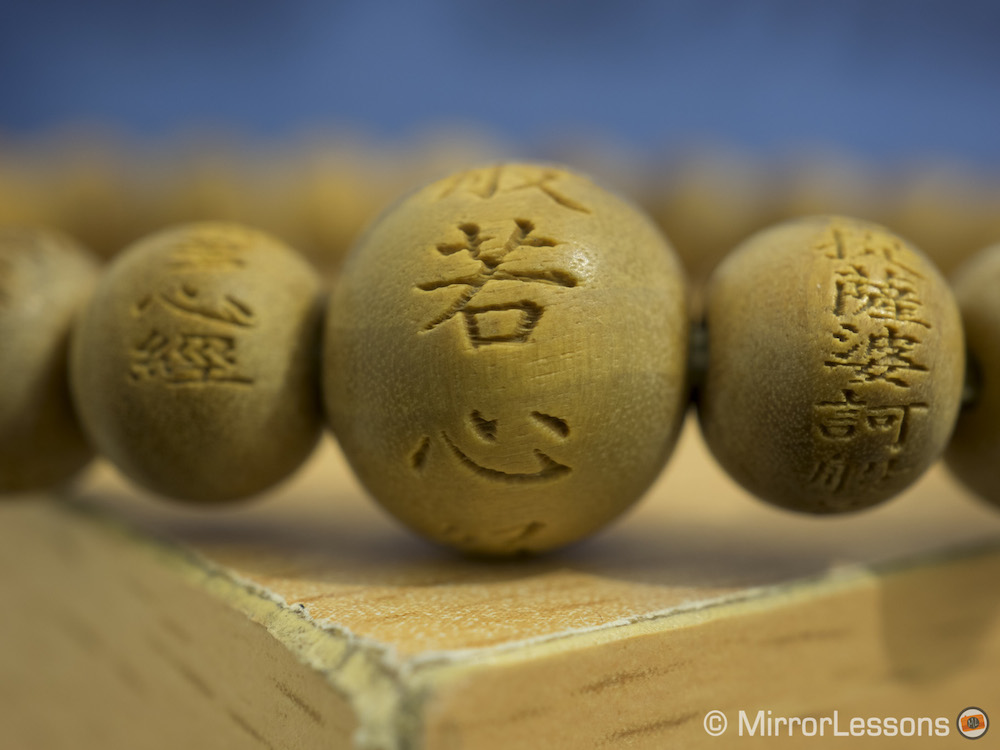
При максимально открытой диафрагме объектив 30mm выглядит менее резким, чем 60mm, но разница незначительна.
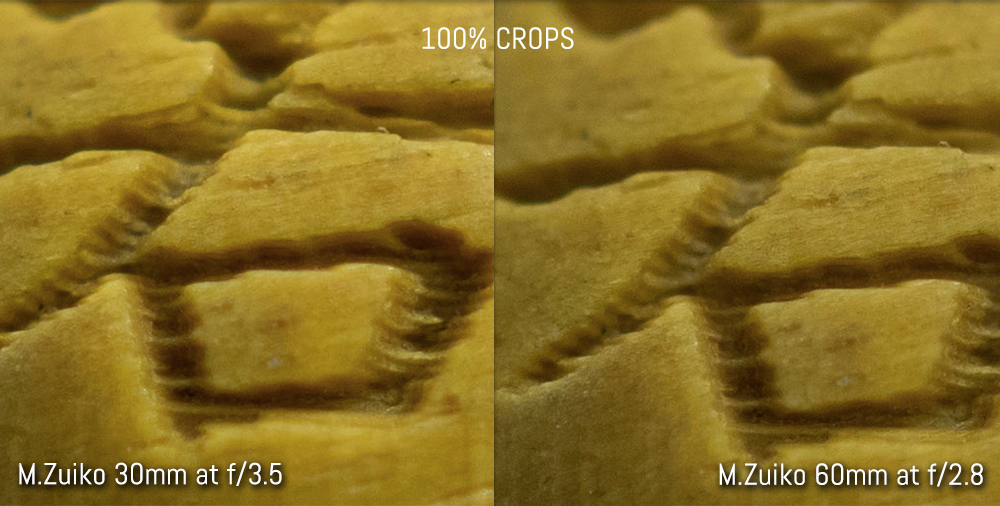
При f/4 объектив 60mm становится еще более резким и показывает лучшую детализацию, однако и 30mm не слишком отстает.
При f/5.6 и f/8 объективы практически идентичны.
Хотя оба объектива начинают страдать от дифракции при f/11, похоже, что 30mm сохраняет чуть более высокую резкость при сильно закрытой диафрагме. Это очень хорошая новость для владельцев объектива 30mm, так как макросъемка требует очень большой глубины резкости, чтобы больше деталей оказалось в поле зрения.

Изображение в зоне нерезкости — боке, у обоих объективов выглядит очень приятно, имеет плавные переходы и равномерное отображение ярких точечных источников света. Так 60mm вдвое «длиннее» и обладает большей светосилой, то на нем проще достичь размытого фона и лучшего разделения по планам на той же самой сцене. Однако у объектива 30mm есть преимущество в минимальной дистанции фокусировки, его 9.5 см меньше, чем 19 см у 60mm, при этом получается большее увеличение 1.25x против 1x.
Ниже показано сравнение прорисовки изображения у объективов вне фокуса на одинаковых сценах.
Геометрические искажения не являются проблемой для какого-либо из этих объективов, однако виньетирование присутствует у объектива 60mm при диафрагме f/2.8, а у объектива 30mm оно не заметно только при f/5.6.
Объектив 30mm больше подвержен хроматическим аберрациями на диафрагмах f/3.5 и f/4, чем 60mm, хотя на обоих объективах они исчезают при f/5.6.
Блики вообще не будут представлять проблему для макросъемки, т.к. объектив редко бывает направлен прямо на солнце. Но если использовать эти два объектива для чего-то кроме макро, например пейзажей, портретов или стрит-фото, то дефекты засветки могут появится в виде светлых многоугольников, ярких лучей света или фиолетового блика разной интенсивности в зависимости от угла съемки.
Для макрофотографии
Минимальная дистанция фокусировки, коэффициент увеличения и фокусное расстояние являются основными характеристиками, которые отличают один объектив от другого.
Объектив 60mm хорошо подходит для съемки самых разных объектов. Минимальная дистанция фокусировки в 19 см в сочетании с увеличением 1:1 и фокусным 120мм 35-мм эквиваленте делают его идеальным универсальным макро-объективом для съемки живых и неживых объектов, т.к. вы можете достичь максимального увеличения без того, чтобы приближаться очень близко, чтобы не спугнуть живой объект съемки.
Этот объектив с превосходной резкостью, благодаря его фокусному расстоянию и диафрагме, можно использовать как обычный портретник.
Объектив 30mm является более специализированным. Его минимальная дистанция фокусировки в 9.5 см настолько мала, что передняя линза почти касается объекта съемки. Таким образом объектив может затенить объект или отпугнуть мелкую живность. По этой причине его лучше использовать с неживыми объектами или с не слишком пугливыми животными, используя внешнюю или кольцевую вспышку.
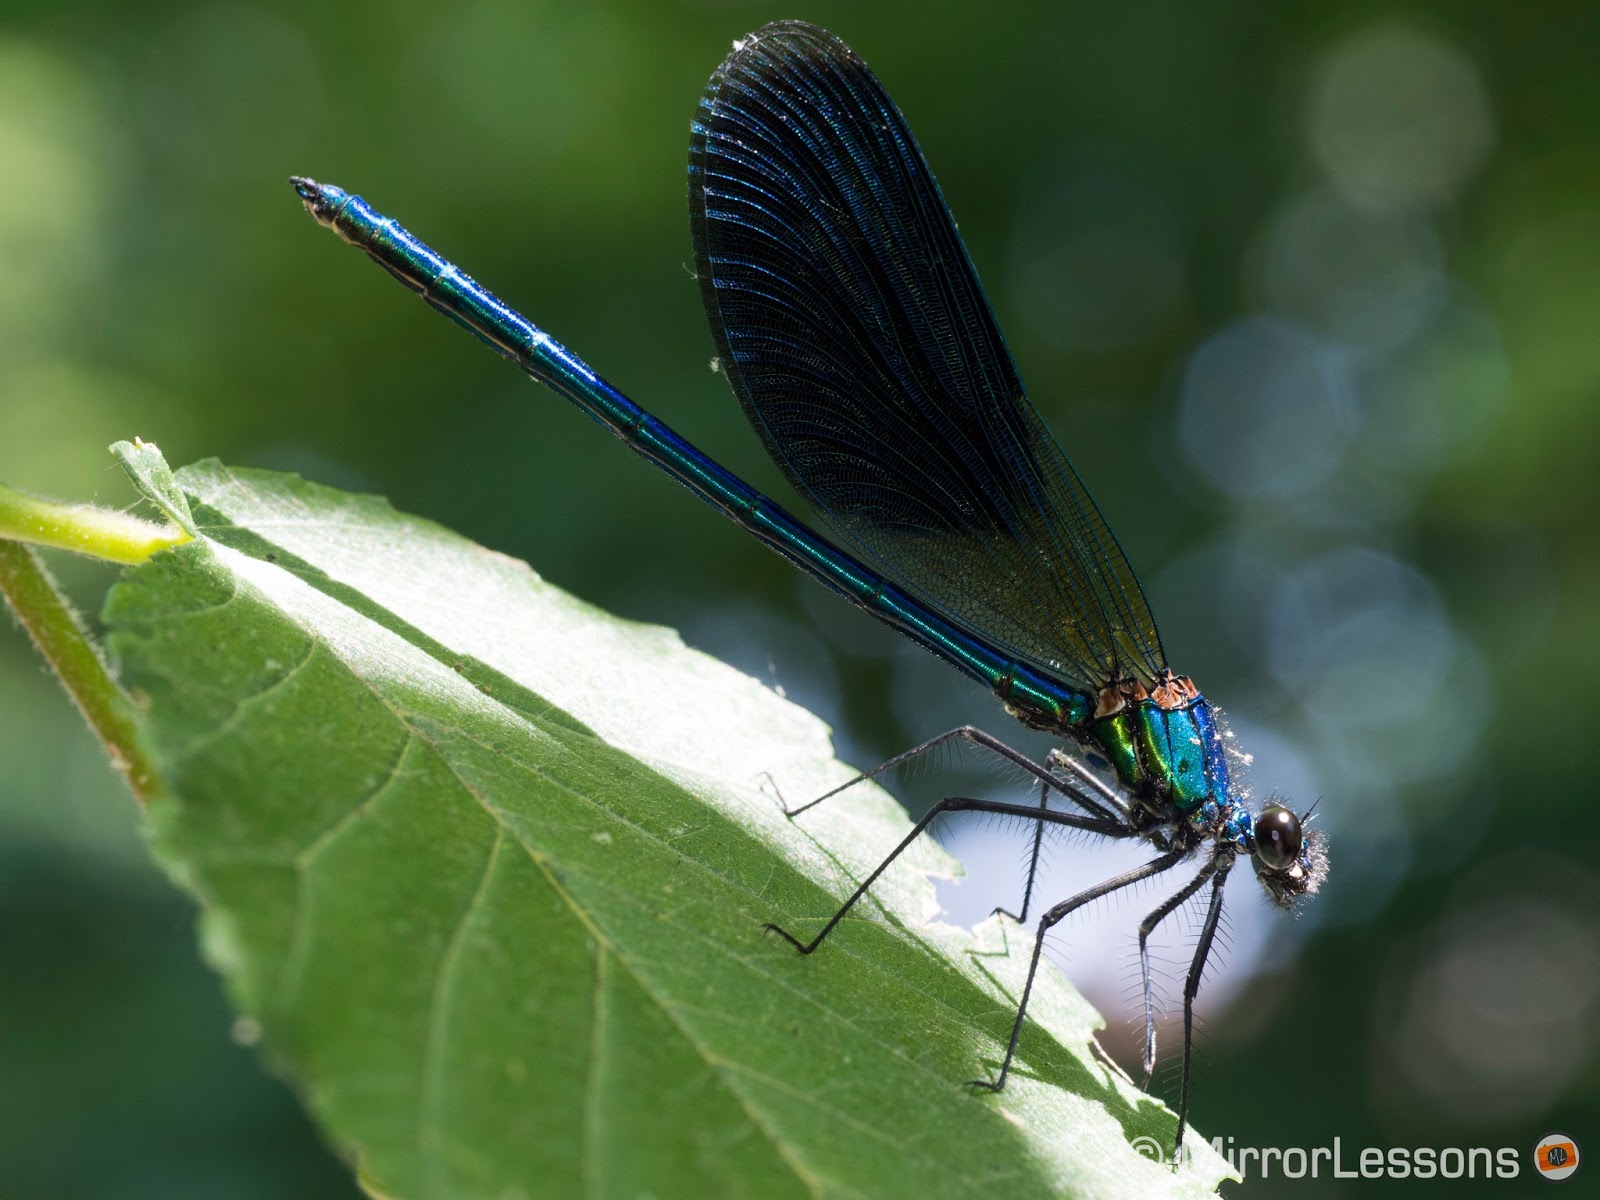
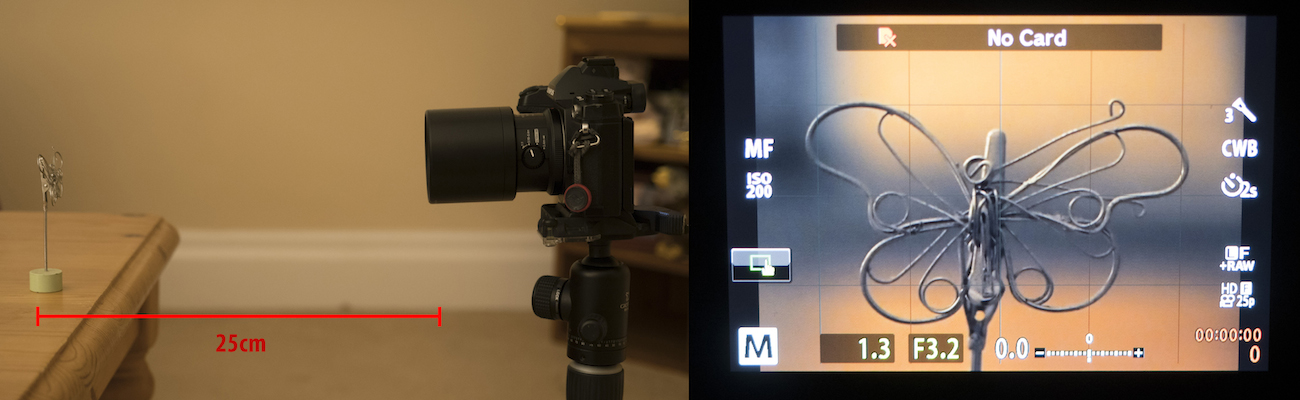
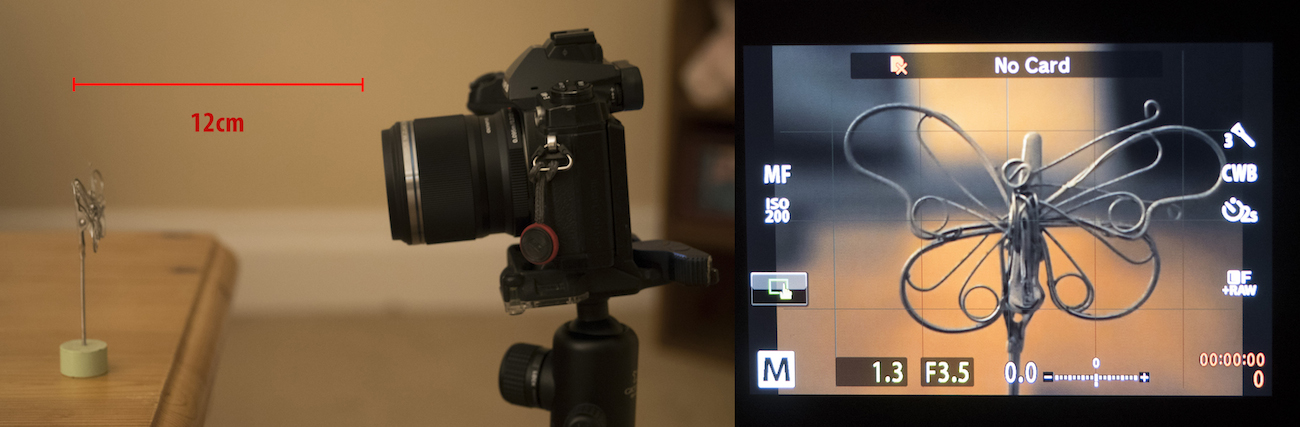
Ниже показан пример расстояния, которое требуется, чтобы заполнить кадр существом размером с бабочку адмирала. Используя объектив 30mm вы легко можете испугать бабочку своим приближением, тогда как при использовании объектива 60mm риск этого намного ниже.
Фокусировка на минимальном расстоянии приводит к вопросу об очень маленькой глубине резко изображаемого пространства, которое будет очень узким даже при диафрагме f/8 или f/11. Это проблему можно решить программно с помощью функции стекинга. Камеры Olympus позволяют снимать несколько кадров при разной фокусировке, чтобы потом их объединить либо сразу в камере, либо с помощью программ обработки изображений. В свежих камерах Panasonic такой функционал тоже есть. Обратите внимание, что для использования стекинга с объективом 30mm на Olympus OM-D E-M1 нужно скачать прошивку версии 4.2.
Автофокус
Как и подавляющее большинство объективов Olympus M.Zuiko, оба макро-объектива при фотосъемке очень быстрые, точные и тихие в режимах S-AF и С-AF. Скорость и точность немного страдают в условиях плохой освещенности. Для видео при включенном C-AF приходится ждать достаточно долго прежде чем объектив зацепиться за объект, либо придется двигать саму камеру, особенно с фотоаппаратами Panasonic Lumix.
Так как Olympus M.Zuiko 30mm и 60mm являются макро-объективами, то более правильно будет их использовать с ручной фокусировкой, помогая перемещением самой камеры, чтобы найти правильную точку фокусировки.
Выводы
Оба объектива, и 30mm, и 60mm, являются отличными продуктами. Их конструкция и оптические характеристики соответствуют характеру системы Micro 4/3. При этом, они оба продаются по разумной цене. Однако есть несколько явных преимуществ у объектива 60mm.
Во-первых это переключатель на корпусе, который ограничивает дистанцию для фокусировки и позволяет очень быстро переключаться. Возможность быстро сфокусироваться обеспечивает серьезное преимущество при съемке быстрых процессов.
Во-вторых бленда, которая складывается, уменьшая общий размер объектива с блендой, до размером самого объектива. При этом она достаточно длинная, чтобы защитить переднюю линзу от повреждений и снижать возможные паразитные засветы.
Третье преимущество объектива 60mm f/2.8 в наличии пыле- и влагозащиты. Учитывая, что многие камеры Micro 4/3 такой защитой тоже обладают, у фотографа появляется возможность спокойно снимать в самых разных условиях, в том числе под снегом и дождем.
Объектив 30mm f/3.5 будет полезен там, где нужна очень маленькая дистанция, он поможет получить впечатляющее увеличение 1.25x. Однако нужно придвинуть объектив очень близко к объекту съемки, передняя линза будет почти касаться его. Поэтому этот объектив больше подходит для мелких предметов, чем для живых существ.
Using Focus Bracketing on the Olympus OM-D E-M10 II
Update: Olympus has announced firmware updates for the E-M1 and E-M5 II that include focus bracketing and focus stacking (E-M1 only) among other things!
It seems that with every new Olympus OM-D camera, we get at least one exciting new feature. And what’s great is that these features aren’t so much “technological gimmicks” as they are a reaction to the realistic needs and interests of photographers.
The first E-M5 gave us in-body 5-axis stabilisation and Live BULB/TIME. Then came the flagship E-M1 with its efficient autofocus system that works with Zuiko 4/3 lenses. It was later followed by the E-M10 which introduced a Live Composite mode, and subsequently the E-M5 II, which gave us a High Res Shot mode.
Now, nearly three years on from the release of the original E-M5, we’ve arrived at the most recent iteration, the E-M10 II. What’s so exciting about this camera? It all comes down to one feature: the Focus Bracketing mode.
What is Focus Bracketing on the E-M10 II?
Focus stacking is a well-established technique used by photographers to extend the depth of field of their images. It involves combining multiple shots taken at different depths of field to bring a subject into focus. Although it is also used for landscapes, it is most frequently applied to macro photography because your depth of field will almost always be shallow with a macro lens, even at the slower apertures. (For an in-depth explanation about focus stacking, I suggest you visit this excellent article by Cambridge in Color.)

E-M10 II, 1/200, f/2.8, ISO 400
10 shots, focus differential of 10 (hand-held)
Post-processed in Helicon Focus
With the new OM-D E-M10 II, we now get a new mode called Focus Bracketing. It allows you to take up to 999 consecutive shots at focus differentials between 1 and 10 in a fast burst. The camera itself will not stack the images. Instead, you must use a stacking software such as Photoshop or Helicon Focus. (You can use either the Raw files or JPGs but keep in mind that the E-M10 II Raw files aren’t yet recognised by most post-production software programs.)
Depending on the number of subjects in the shot, your distance from the subject, how much of the subject you want to capture, and your chosen f-stop, the number of shots and the focus differential required will vary. Knowing which values to choose is really a matter of trial and error, though experimentation and experience will help you make an educated guess. Generally speaking, you’ll need more shots if:

- there are many subjects in your composition at varying distances from the lens
- you are very close to your subject
- you want to cover a wide depth of field
- you are using a fast aperture
E-M10 II, 1/320, f/5.6, ISO 800
10 shots, focus differential of 5 (hand-held)
Post-processed in Helicon Focus
The focus differential is the distance between the in-focus areas in each shot. With a higher focus differential (8-10), the distance between each shot is wider, so it is more likely that you’ll end up with gaps between the in-focus areas of your image, especially if you use a very fast aperture. These will appear as out-of-focus bands in your composite image. However, you don’t want to use a focus differential that is too low (1-2) unless absolutely necessary, as you will wind up dozens of shots that barely differ from one another.
Below is an example of the difference between a focus differential of 5 and 10. (The images have not been retouched.) In the “10” example, you can clearly see some blurry banding where the focus hasn’t been captured.


The important thing is that each shot overlaps the depth of field of the previous shot. I’ve found that a focus differential of 5 tends to work well for most close-up work, but I will use lower values if there are many small details or intricate patterns in my composition that would be hard to reproduce in post production with a cloning tool.
How does the Focus Bracketing function work?
Focus bracketing, like the other bracketing options, can be activated from Shooting Menu 2. It is the final option on the list. Simply enter the menu and turn all the options to ‘on’. You will soon notice that the shooting mode has automatically shifted to High burst/silent and cannot be changed as long as focus bracketing is active.

To take a series of bracketed shots, prepare your composition and focus on the part of the subject nearest to the lens by half-pressing the shutter button. (You can also do this manually by turning the focus ring on your lens until it brings the closest element into focus.) Then, fully press the shutter button to release the burst. You’ll see a live view of the burst on the LCD screen of the E-M10 II, which will give you an idea of just how much depth of field you’ve captured.
Below you can see a quick video that demonstrates how the function works:
Since the burst is very quick, it is possible to perform focus bracketing hand-held as long as you aren’t too close to your subject and avoid moving too much during the burst. (The E-M10 II’s 5-axis in-body stabilisation, which is present on almost all OM-D cameras, also helps to this end.)
Being able to shoot a quick burst hand-held is one of the great advantages of the Focus Bracketing function compared to traditional manual focus bracketing. The latter requires you to manually choose your focus points, which isn’t just time-consuming but also hard to perform with moving subjects like insects. With Focus Bracketing, you can take dozens of images in mere seconds and capture your subject before it moves. Plus, since the focus differentials are pre-calculated in-camera, you’ll be less likely to miss a spot.
 E-M10 II, 1/160, f/5.6, ISO 800
10 shots, focus differential of 5 (hand-held)
Post-processed in Helicon Focus
Keep in mind that hand-held focus bracketing can be quite challenging; it is much easier to perform if you are shooting at a distance than it is when you are very close to your subject. For example, the image of the large butterfly you see below was shot hand-held (15 shots with a focus differential of 5 and f-stop of 3.2). I wasn’t very close because I wanted the entire butterfly in my composition, and as such, my movements weren’t as amplified as they would have been at a closer distance.

E-M10 II, 1/200, f/3.2, ISO 400
15 shots, focus differential of 5 (hand-held)
Post-processed in Helicon Focus
For serious macro work, however, you’ll most certainly want to use a tripod. At close distances, any small movement caused by breathing or shaking will dramatically change your composition. Likewise, if you are dealing with living subjects, their movements will also be exaggerated, so you’ll want to start the burst when they are immobile.

E-M10 II, 1/125, f/5, ISO 200
30 shots, focus differential of 3 (tripod)
Post-processed in Helicon Focus and Photoshop
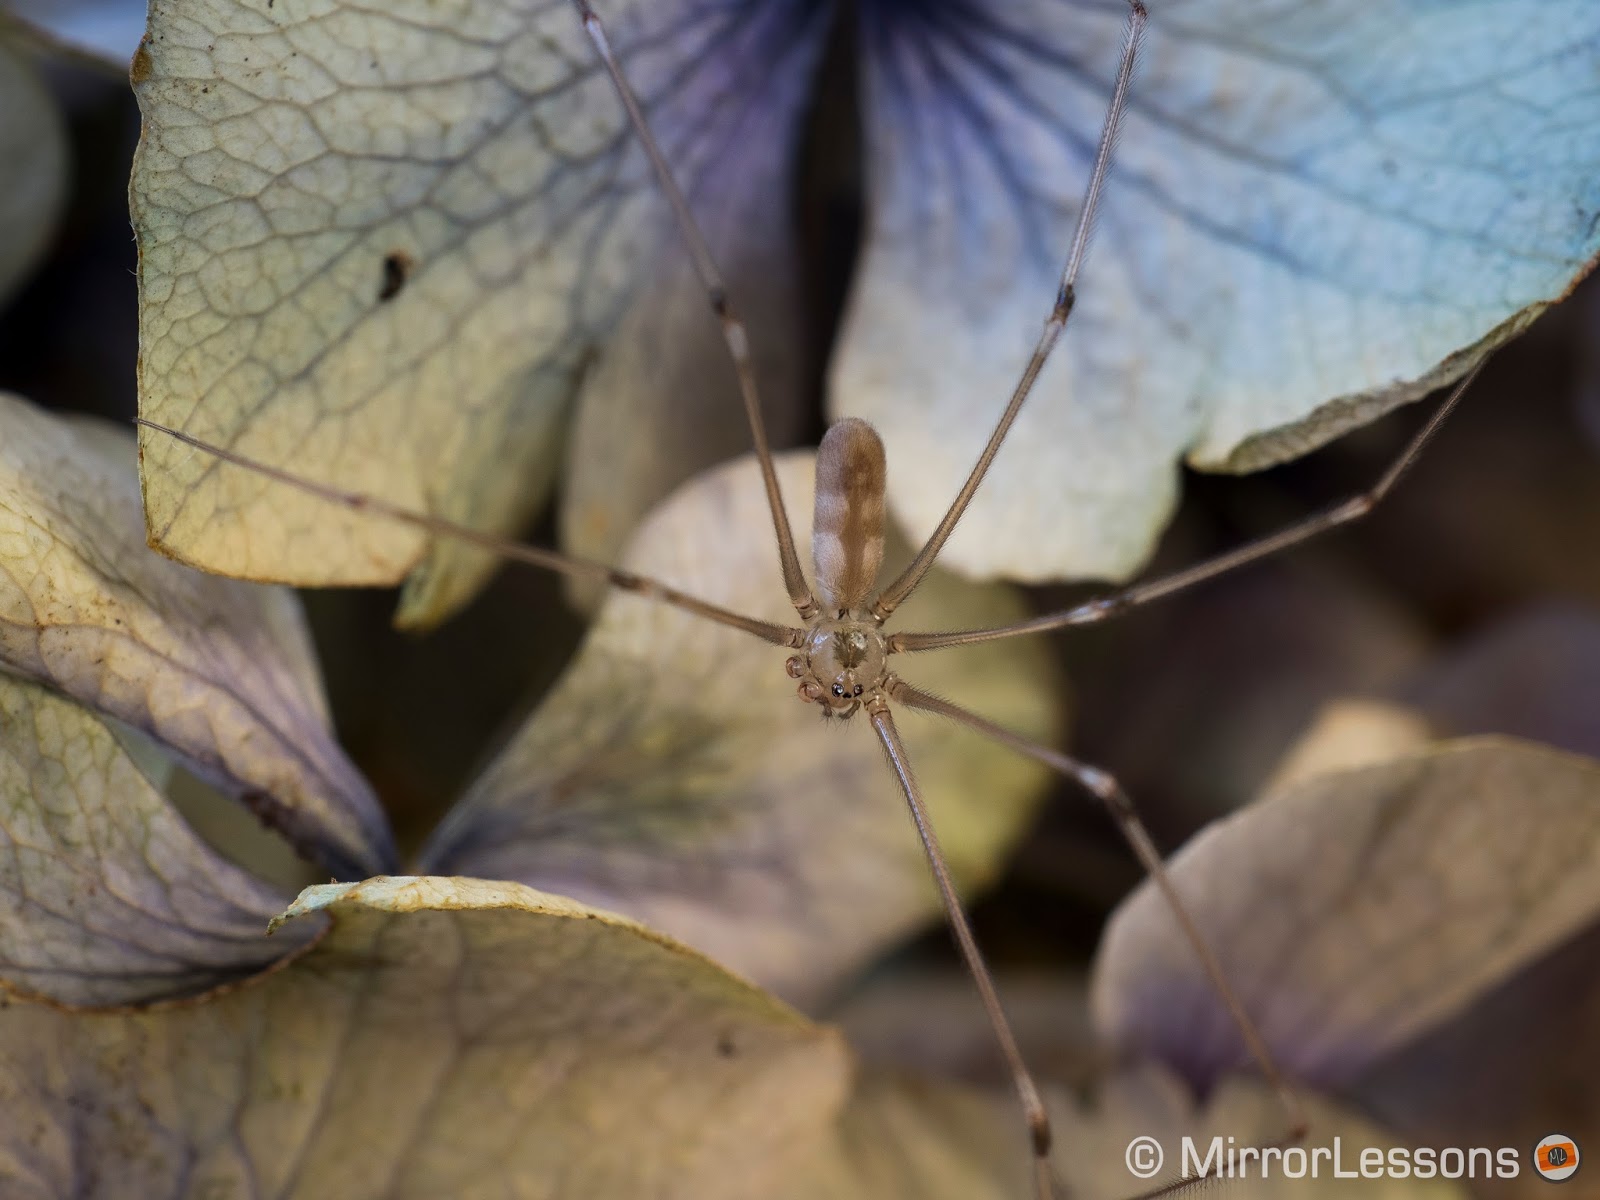
The image you see below was taken at nearly 3:1 magnification on a tripod with the M.Zuiko 60mm macro and the Raynox 250 adapter. The 65 shots with a focus differential of 4 and f-stop of 3.2 were enough to cover the depth of focus occupied by the spider, as well as some of the leaf in front of and behind it. The rest of the leaf was filled in using a cloning tool in Helicon Focus.
 E-M10 II, 1/30, f/3.2, ISO 200
65 shots, focus differential of 4 (tripod)
Post-processed using Helicon Focus
Can you use flash?
Macro photographers will be glad to know that Focus Bracketing can be used with flash, albeit with a few limits. For instance, the flash must be attached to the hotshoe (no RC) and it only works in manual mode. What’s more, you cannot use a shutter speed faster than 1/20 of a second with flash. This is probably to avoid banding at faster shutter speeds since the camera uses the electronic shutter with this function. Unfortunately, this also means that it only makes sense to use Focus Bracketing and flash with static subjects.
It is also important to note that the camera will always wait for the flash lamp to recharge before taking the next shot. (The same thing happens with the E-M5 II and its High Res Shot mode.)
The function delivers a fast burst if your flash’s battery is fully charged. However, if your flash’s recycle time is slow, the amount of time you have to wait between each shot will increase.
We used our Nissin i40 flash along with two sheets of white paper to bounce the light to take the shot of the van below. We noticed a slight variation in illumination between shots due to the electronic shutter but it did not affect the appearance of the final composite image.
 E-M10 II, 1/8, f/3.2, ISO 200
20 shots, focus differential of 5 (tripod, flash)
Post-processed using Helicon Focus
Case Studies: Focus bracketing in practice
To give you an idea of the settings you might want to use in focus bracketing mode, I’ve prepared three basic case studies below.
Case Study #1 – Hand-held shot of flower
This shot of a cosmos was taken hand-held at Bodnant Gardens in North Wales. Since it was cloudy and slightly breezy, I had to use a higher ISO (800) to maintain a shutter speed of 1/200s. (It is always better to have some noise than to wind up with blurry images that are un-stackable.) Since I wasn’t doing extreme macro work or covering a lot of depth of field, I chose to set my aperture to f/7.1, take fewer shots (10) and keep my focus differential to 5.
 E-M10 II, 1/200, f/7.1, ISO 800
10 shots, focus differential of 5 (hand-held)
Post-processed in Helicon Focus
Case Study #2 – Tripod shot of spider (animate object)
Having a tripod definitely makes the macro photographer’s life easier, as it eliminates the chance of your movements affecting the sharpness of the image. Still, you have to be aware of your subject’s movements. Although the spider in this example wasn’t moving, the web it was perched on was quivering in the breeze and I was working at a very close distance (1:1 magnification). A shutter speed of 1/320 was required to keep the spider in focus. To keep my ISO at 200, I opted to use a faster aperture of f/3.5 but more shots (40 in total) with a smaller focus differential of 3 to cover the whole depth of field.
 E-M10 II, 1/320, f/3.5, ISO 200
40 shots, focus differential of 3 (tripod)
Post-processed in Helicon Focus
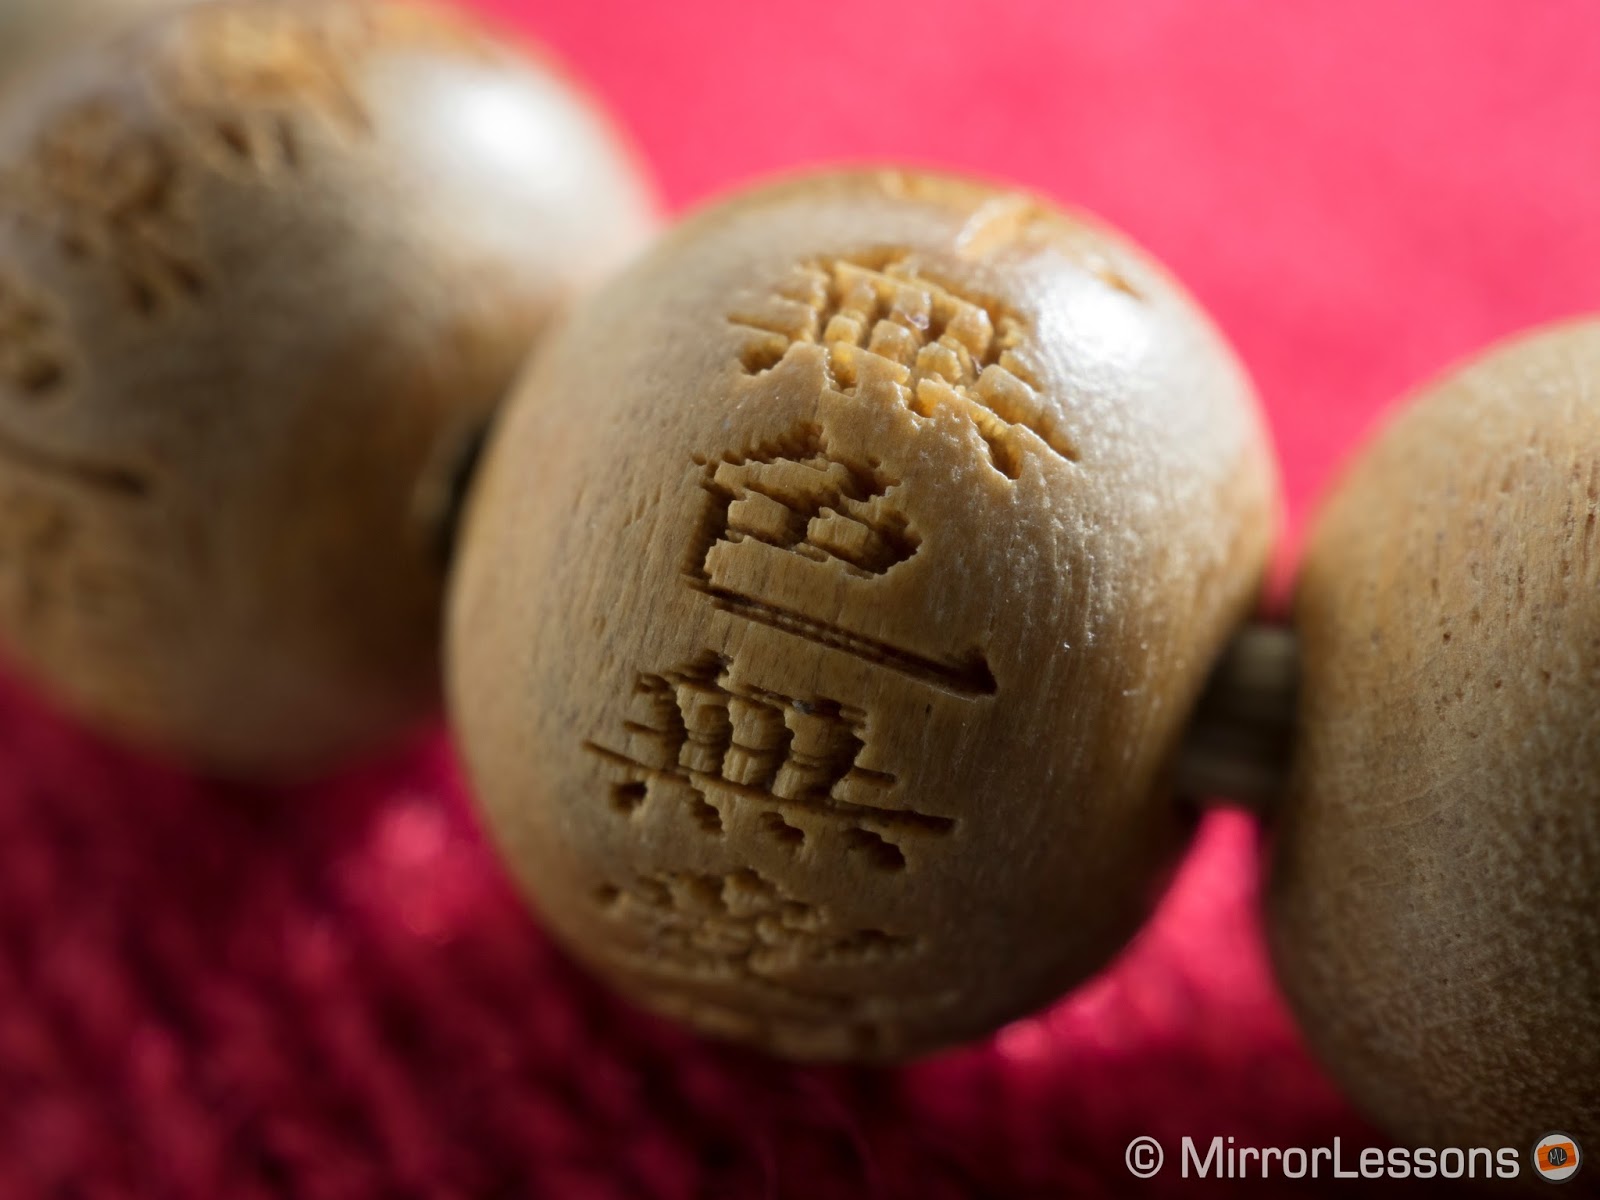
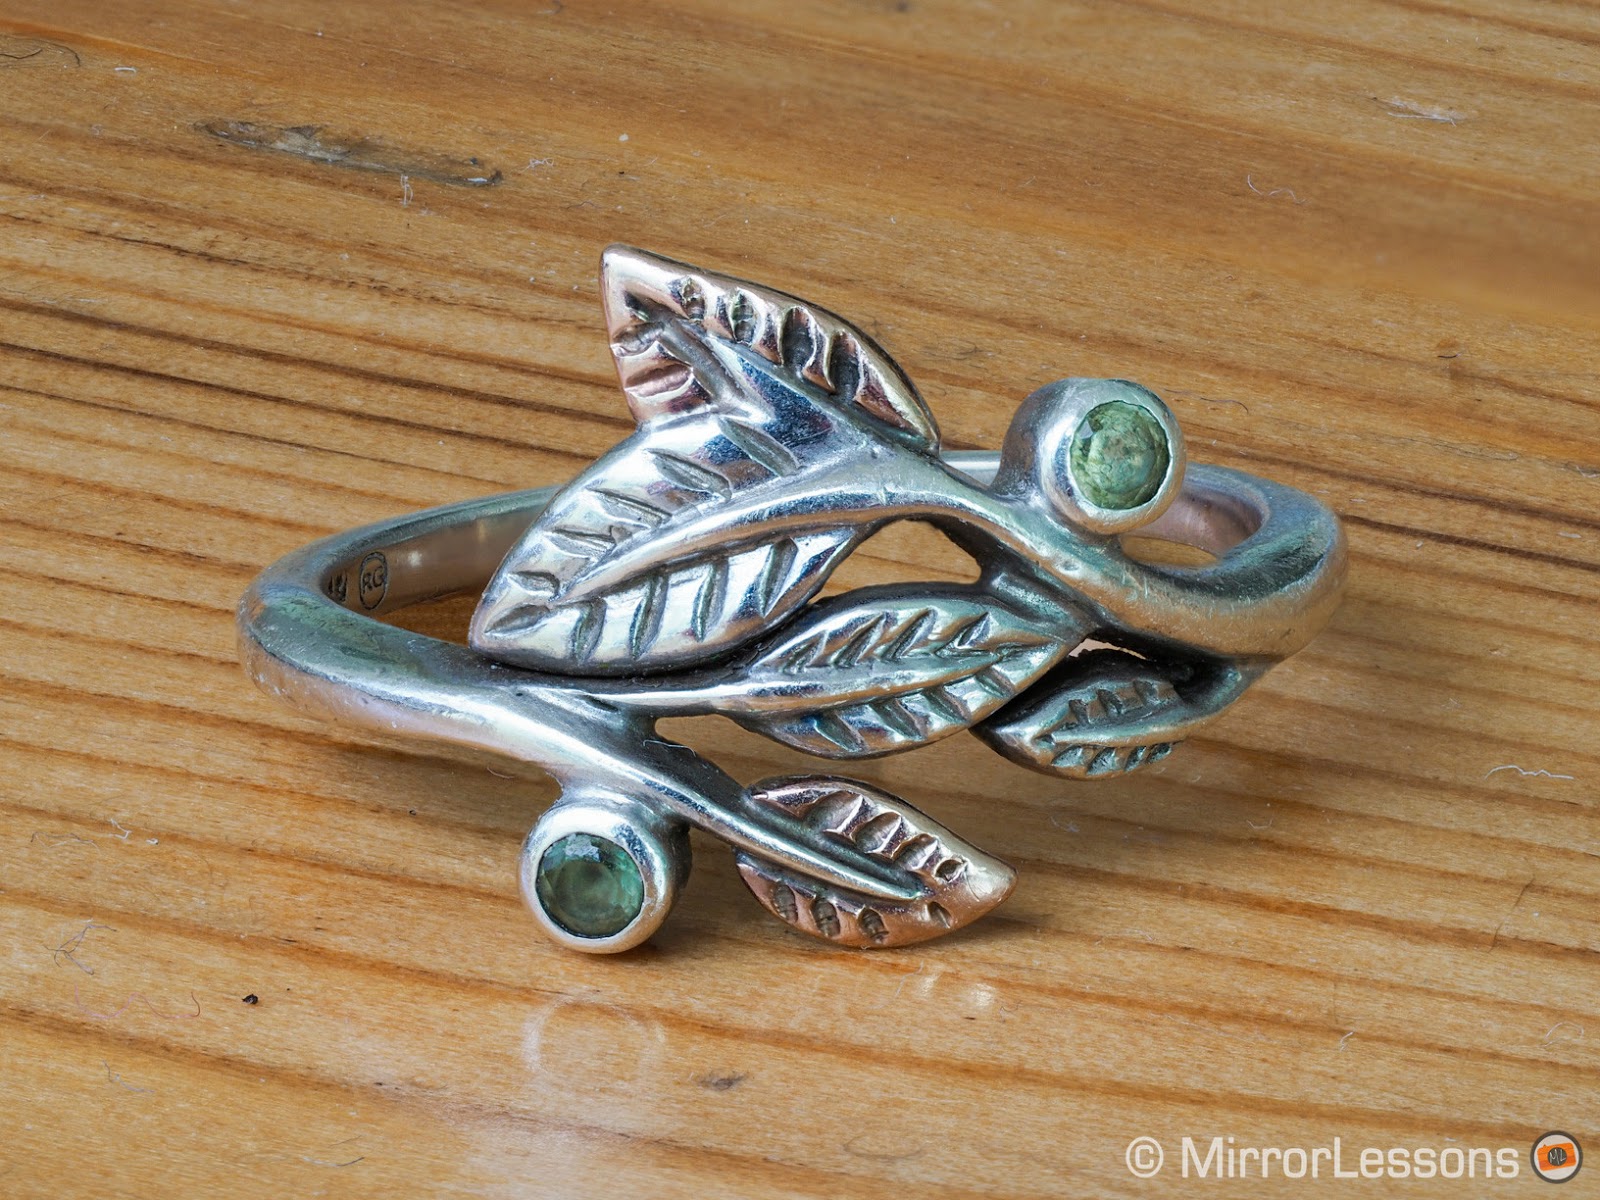
Case Study #3 – Tripod shot of ring (inanimate object)
When you are photographing an inanimate object in a studio environment on a tripod, movement is taken out of the equation. This means you can use any shutter speed, aperture or ISO you want. Ideally, you’ll want to keep your ISO as low as possible and use the aperture that delivers the best sharpness. Since the M.Zuiko 60mm macro’s sharpness peaks between f/5.6 and f/8, I decided to use f/8 to cover as much depth of field as possible (the ring and table) with the least number of shots. After some trial and error, I settled on 25 shots and a focus differential of 5.

E-M10 II, 1/6, f/8, ISO 200
25 shots, focus differential of 5 (tripod)
Post-processed in Helicon Focus
Are there downsides to Focus Bracketing?
While the focus bracketing function works very well overall, there is one major bug that I hope Olympus will work out with a firmware update. After a burst (particularly one consisting of many shots), the camera occasionally won’t let you change any of your settings. This includes the focus point, shutter speed, aperture, access to the menu, and pretty much everything else. The only way to resolve the issue is to turn off the camera and turn it back on after a few seconds. Unfortunately, this software bug caused me to miss some good shots of insects who weren’t willing to wait around while I fiddled with the camera.
What’s more, you cannot set a 2-second timer before a burst. This can be problematic at slower shutter speeds since pressing the shutter button can cause micro movements.
The other disadvantages are those associated with all electronic shutters.
Some energy saving fluorescent lightbulbs can also cause banding when you use an electronic shutter. The only solution is to use “safe” shutter speeds that match the fluctuations of the electric current in your country. These are usually shutter speeds divisible by 50Hz in Europe (1/50, 1/25, etc.) and 60Hz in the US (1/30, 1/15, etc.).
Also be aware of rolling shutter issues if you take your shots hand-held. It becomes more problematic the closer you get to your subject. Below is an example of rolling shutter in two shots taken hand-held at nearly 1:1 magnification.


Finally, the function chews up battery life like nobody’s business, so make sure you have at least one spare!
Conclusion
At first glance, focus stacking may seem like more trouble than it’s worth, but for anyone who is serious about macro photography, it is an invaluable way to gain more creative control over your images.
Though it has always been possible to stack images by manually selecting various focus points and combining the shots in a post-production software program, the technique has mostly been used for static subjects. This is because the process of taking all the images necessary for the composite is too long and meticulous to be useful for active subjects.
The E-M10 II’s Focus Bracketing function has made the whole process faster, easier and more accurate. Yes, you still have to stack the images in post-production, but because the camera takes multiple shots in a very quick burst, hand-held shooting is now an option, as is photographing moving subjects that only settle for a brief period of time.
There are a few pitfalls such as rolling shutter, banding in artificial light, and not being able to use a timer but these can all be overcome by shooting in well-lit conditions on a tripod (or at the very least, with a very steady hand).
To see some more images taken using the Focus Bracketing function on the OM-D E-M10 II, be sure to check out our SmugMug gallery. As always, if you have any questions about this function or the camera, don’t hesitate to leave us a comment below!
About Heather
Heather Broster was born in Canada, has lived in Japan and Italy but currently calls Wales home. She is a full-time gear tester at MirrorLessons. You can follow her on Google+, Twitter or Facebook!
https://www.fotoblog365.com/2016/12/olympus-mzuiko-30mm-f35-60mm-f28.html?m=1